This article is based on one core component that's revealed in The Product-Led Playbook. Packed with case studies and templates, it's the go-to manual you need to build a successful product-led business.
In its simplest form, a product-led model is what you decide to give away for free and what you charge for. That could mean a free trial, a freemium model, or a mixture between the two (hybrid).
The best product-led models give your users everything they need to succeed at each stage of their user journey.
Yet, designing your product-led model is hard for several reasons.
It touches every part of your business.
It impacts how you acquire users because what you give away for free is part of the promise to users when they sign up.
It impacts how you engage users because you’re making decisions on their behalf about what obstacles to help them with and which ones to charge them to solve.
It impacts how you monetize users because you decide what is free and what’s not.
If you don’t understand your ideal user well, you will make some costly assumptions by the time you get to this component.
And even if you do understand your users well, you can still get your model wrong when you don’t know what you’re doing.
Take Tettra as an example.
Case Study: Going From a Free Trial to Freemium (and Surviving)
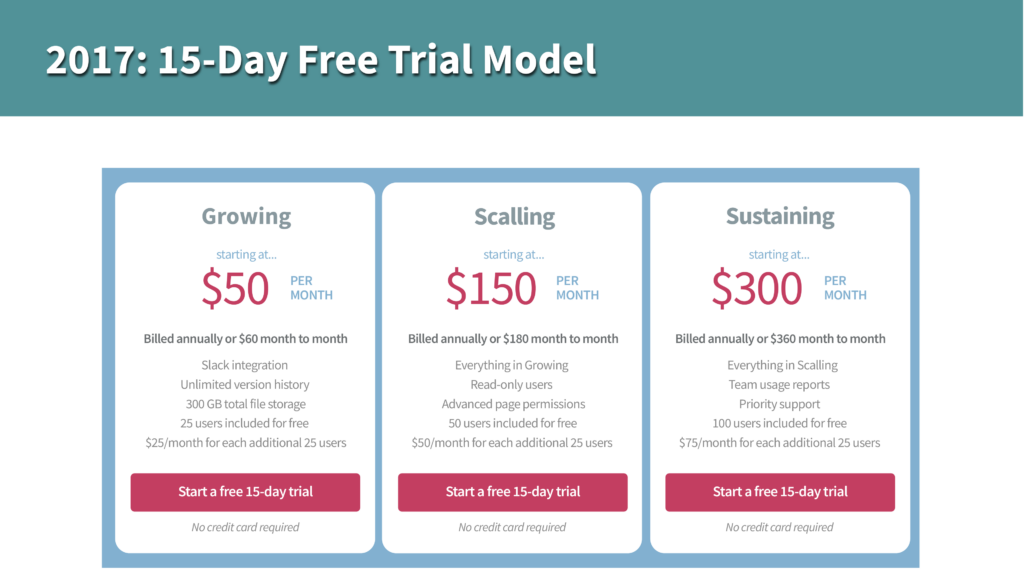
Tettra is an online knowledge base for your team that makes it easy to create and share important documents like your time-off policy. They initially had a 15-day free trial model and found it hard to scale the business.
They had relatively high short-term churn and mediocre conversion rates across the board.
But more importantly, what could users do in 15 days with an online knowledge base tool?
They could create a few documents and share them with a few colleagues…
But would you invest much time and effort into using a knowledge-based solution if you knew you only had 15 days to use it before being charged?
Probably not. Tettra couldn’t shine with its free trial model.
The real value of a team knowledge base kicks in when you build up a lot of important company documents over time and then train a new or existing employee on them. That’s when the real value and “aha” moment comes into play.
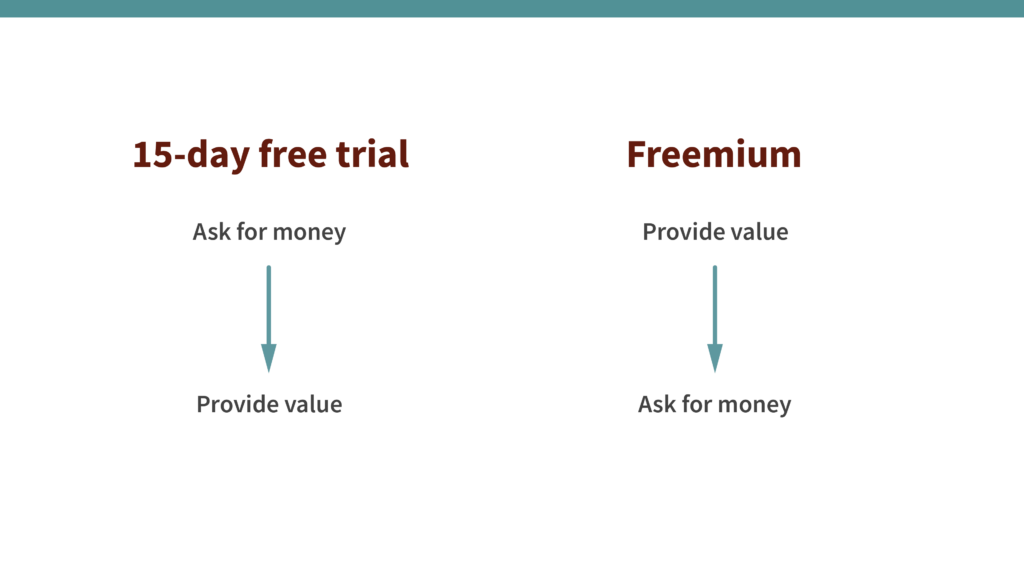
Without knowing it, Tettra had created a product-led model that prioritized asking for money upfront versus providing value.
A freemium model could do the opposite by providing enormous value upfront and asking for money when the time was right.
The folks at Tettra knew their free trial model was missing something, so they took a gamble on freemium.
And it worked.
The freemium model allowed users to try the product without a time limit. In addition, they didn’t ask for their credit card information, which ultimately led to more people onboarding, finding the value, and converting.
While more “tire kickers” drained resources (or users using the product without the intent to buy), it’s manageable with automation, and the increase in signups has been greater than the drain.
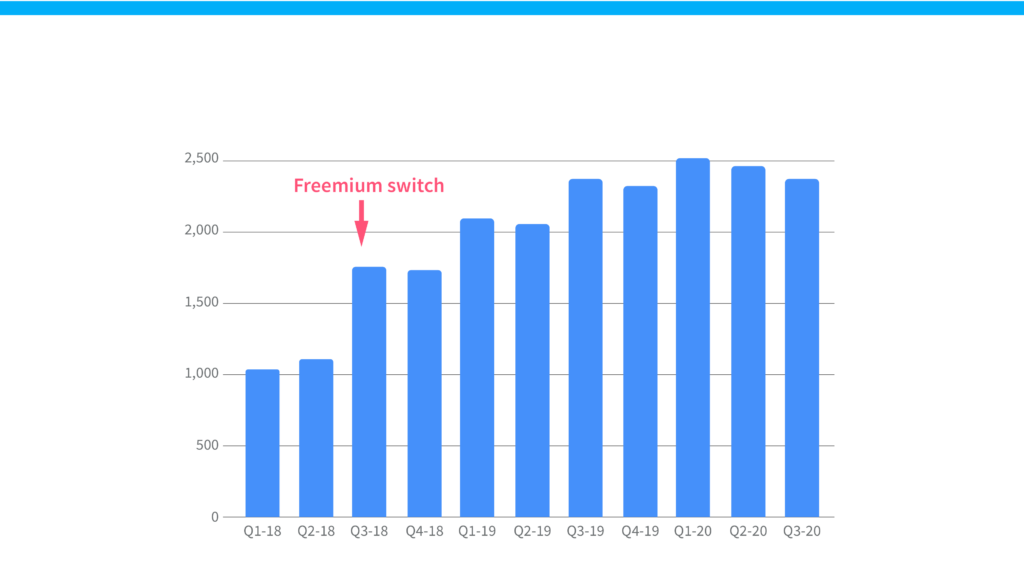
But would upgrades increase?
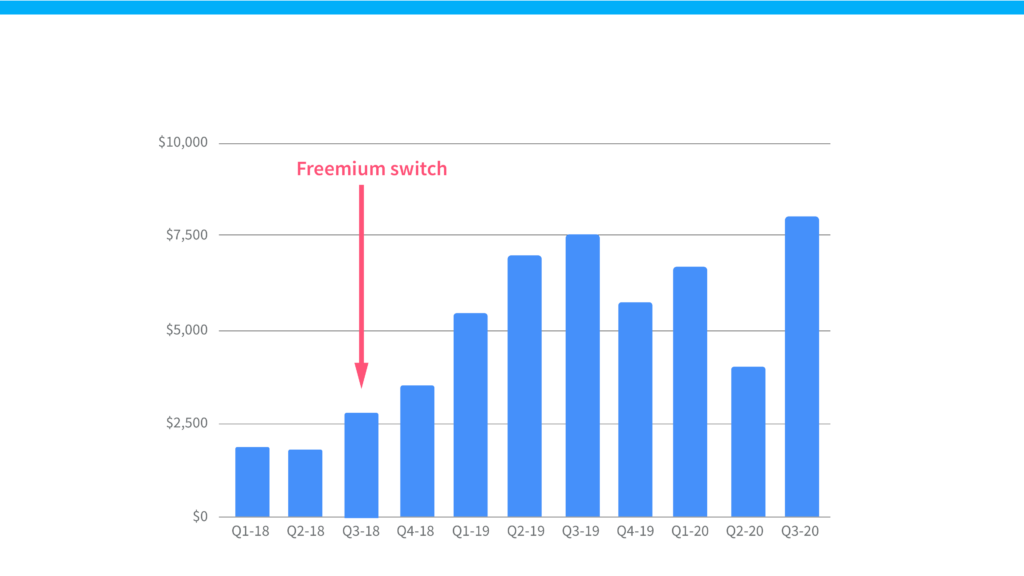
Since Tettra expected Monthly Recurring Revenue (MRR) to go down, the hope was that the number of upgrades would be significant enough to counteract the drop in new MRR.
Luckily the freemium switch tripled the number of upgrades by the 5th quarter.
But would the freemium model improve retention?
Here are Tettra’s retention rate percentages per month before launching the freemium product (June 2017 to June 2018) versus after they made the change (July 2018-August 2019).
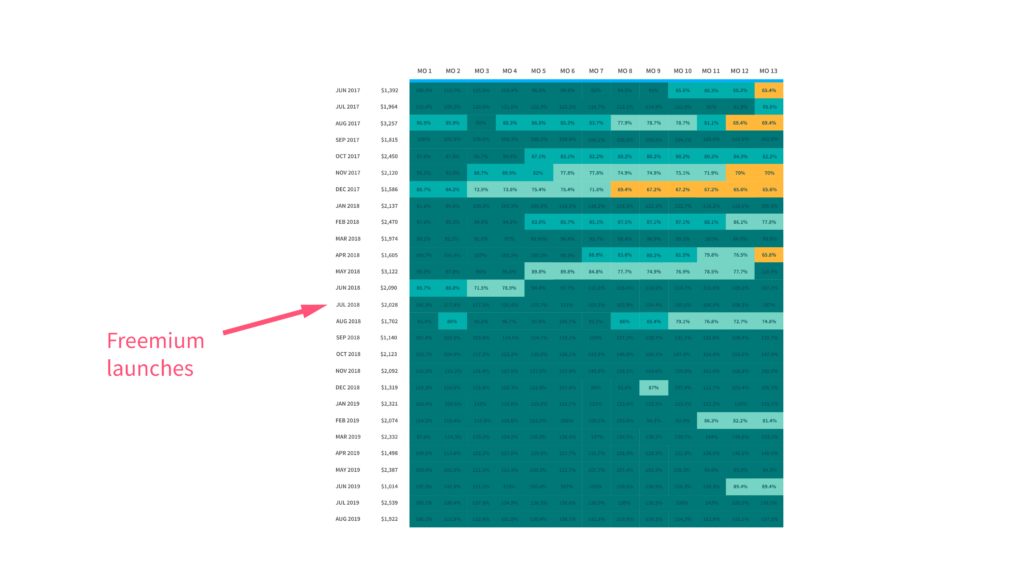
The Cohort Chart shows that retention was a lot better. After the freemium launch, it never dipped below 70% **and consistently led retention rates of over 100% throughout the year.
So if you take nothing else from the Tettra story, let it be this: when you identify the right product-led model, good things happen.
It’s easier to scale.
It’s easier to convert users into paying customers.
It’s easier to keep customers.
It’s easier to get more potential customers in the door.
Yet, you’ll probably think I’m crazy when I say this…
The product-led model you choose doesn’t matter.
There are multi-billion dollar companies that have free trials, freemium models, reverse trials, and many other free models.
Just because freemium worked for Tettra doesn’t mean it’s right for you.
Believe me, you can find a company that has made each of these product-led models work.
So let’s get something very clear.
What goes into the model matters more than the model itself.
I’ve seen companies with incredible products botch their free trial because they didn’t give enough time to their users to reach the “aha” moment.
The best product-led models solve a meaningful problem for your users.
Sometimes that takes days; other times, that takes months.
The biggest challenge in building your product-led model is deciding what goes into the model itself, which is why we are going to spend the majority of our time focusing on that today.
What goes into designing a winning product-led model
Start with these principles first:
Showcase how your product shines
Your unique differentiator and why your product is better must be apparent in your free model. For instance, with Tettra’s first free trial, users weren’t able to see why Tettra was much different than Google Docs. However, when they switched to the freemium model, users had time to truly see how collaborative Tettra was and how it made onboarding new employees so much easier than before.
Give enough value for users to get results
Assure users have enough time, resources, and features to get value – the last thing you want to create is a free trial where users poke around for a few minutes and leave because, well, they can’t do anything in the product.
The only result you could get in Tettra’s free trial was sending a few documents to some colleagues. Whoopie. It wasn’t impactful. If anything, it felt a bit underwhelming. Another recent example of a product I signed up for was a course hosting solution. They had a 14-day free trial. I poked around and ended up not using them because the level of investment required was overwhelming. I had very specific requirements that needed to be met.
This brings us to…
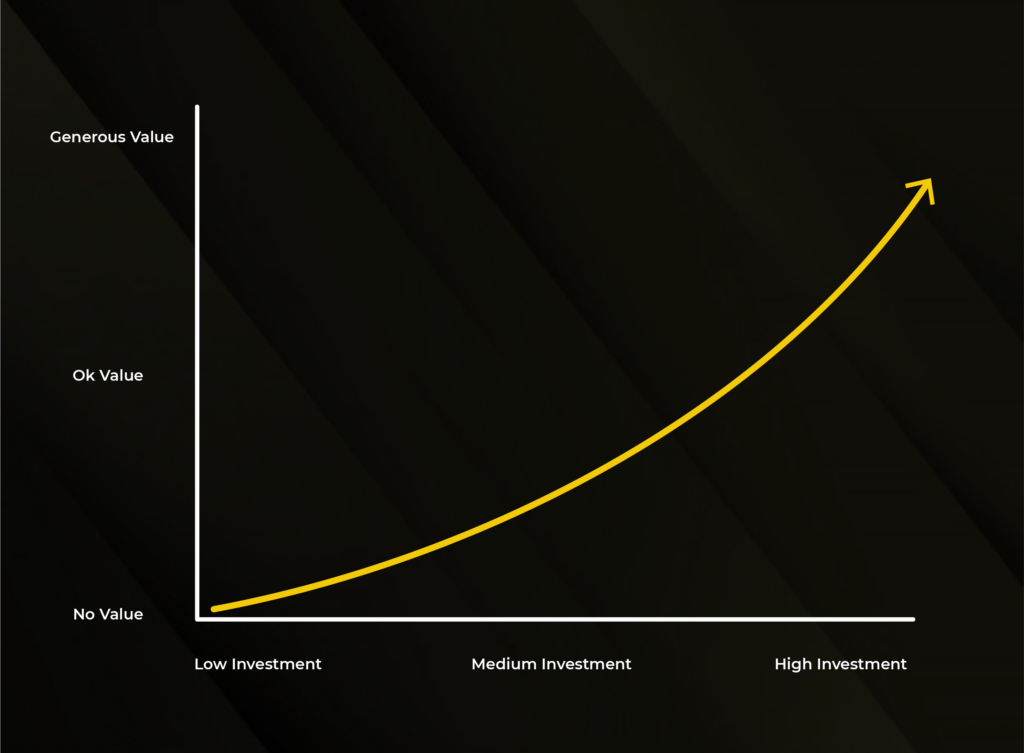
Match the level of free value with the level of effort required
The level of investment from the user must match the level of free. It’s not a perfect science, but if your product requires a high degree of effort to get value, there should be an equally high level of free value.
Why?
Is the lemon worth the squeeze?
A user might bend over backward to use your solution if there’s an incredible amount of free value. Yet with a 1-day free trial, they might not bother to even sign up, knowing that they can’t do much with your product in that limited amount of time.
When you match the level of free value with the level of effort required to see the value, you’ll notice that your users will be more invested in using your solution.
Now that you know the first principles, let’s get into the specifics of how you can build out your product-led model.
How to build your product-led model
Luckily, you’ll see how simple building a world-class product-led model can be if – and only if – you’ve completed the User Component.
Everything in the ProductLed System™️ builds off each other, so if you haven’t completed the User Component, do that first and then come back here.
For example, if users aren’t getting value in the product, we reasonably assume it’s an onboarding issue when it’s not.
The trickiest part about having a bad product-led model is that the symptoms are easy to spot, but the root issue is not.
For instance, do you have a low free-to-paid conversion rate because your onboarding sucks or because you’re not giving away the right features in the first place?
Most teams try to solve this the best way they know how, which is solving the symptom that screams the loudest.
For example, if users aren’t getting value in the product, we make the perfectly reasonable assumption that it’s an onboarding issue when it’s not.
Then the team wastes months fixing the onboarding only to discover that it barely improved the conversion rate and was a big ol’ waste of time.
In the Model Component, you’ll learn how to avoid some of these rookie mistakes. We’ll help you craft a world-class product-led model by following our 2-Phase Process.
Phase 1: Build your Model
In less than 5-minutes, you’re going to build out your V1 product-led model.
It’s easier than you think at this point (this is because you’ve already completed the User Component).
Phase 2: Upgrade Your Model
We’ll go through our 5-Step Process to consistently upgrade your model so that you can proactively solve some of the hardest obstacles for your users and ultimately help more of them experience success with your solution.
What the end result looks like
The end result of completing the Model Component will be a framework to clarify the following:
- Which features to give away for free.
- Which features should be behind the paywall.
- What you need to do to help your users become successful.
What’s unique about this approach is that every team can play a part in helping your users become successful. This is not limited to the Product Team.
To get the most out of this process, I recommend you design your product-led model with your go-to-market team. Everybody will see things from a different lens – whether that’s from a Marketing, Sales, Support, Engineering, or Success lens.
Bonus points if you include a customer in this process as well.
You can continue reading and completing this on your own first, but I challenge you to complete this as a team. That’s one of the reasons why we built ProductLed Academy. It’s where we help teams go through this process together.
Let’s dig in!
Phase 1: Build Your Model
In the User Component, we left off with understanding what the main milestones were in your user journey.
If you’ve done your homework, you know what your beginner, intermediate, and advanced milestones are in your user journey. (Again, I can’t stress enough how important it is to complete the User Component first.)
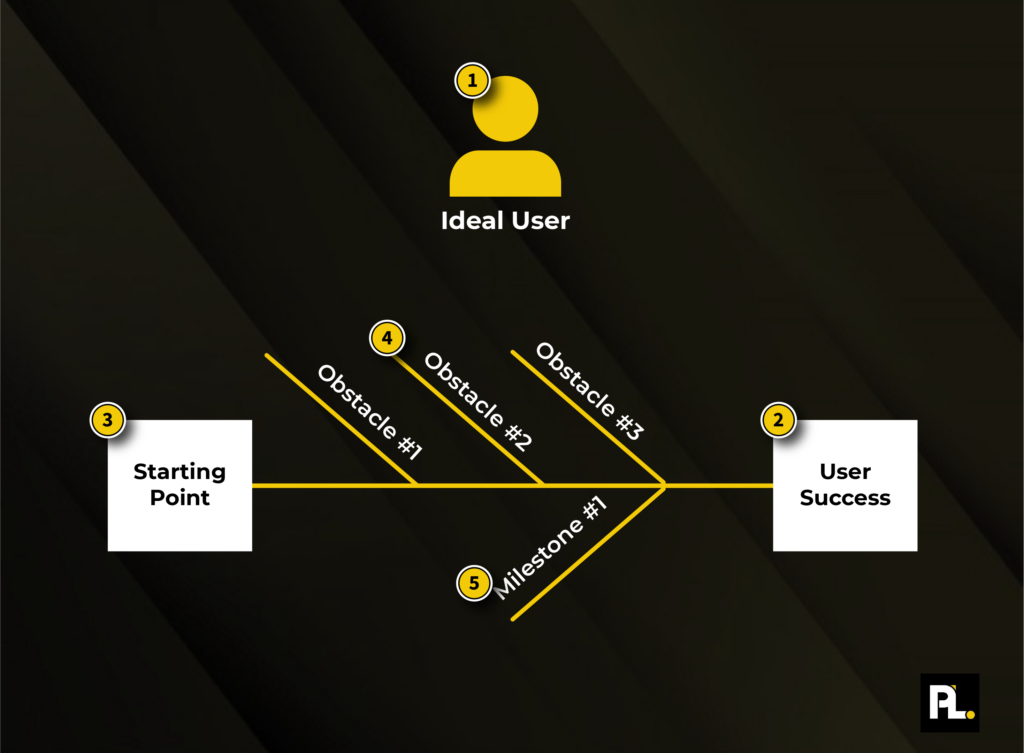
Each milestone represents a new unlocked level for your user.
This will help you decide what to give away for free and what to gate.
Every obstacle that a user encounters in pursuit of their beginner milestone is what we give away for free. Then, you’ll gate the intermediate and advanced milestones behind a paywall.
Here’s what this model would look like visually:
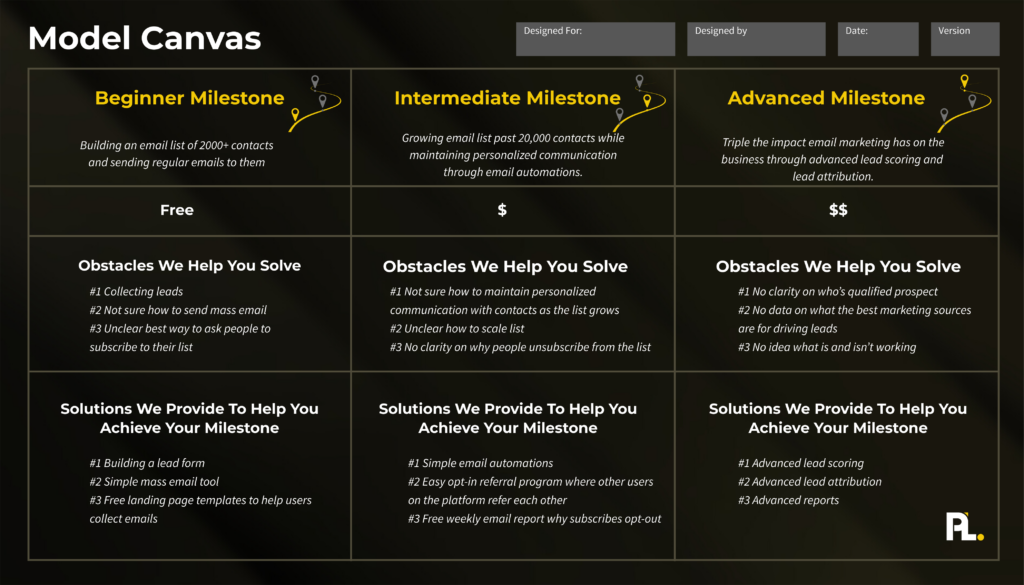
For example, here’s how this would work for an email marketing company:
There is no need to debate whether to use a free trial, freemium, or fancy reverse trial.
Anti-climatic?
Yes.
Effective?
Yes.
You’ve already worked hard to understand what those main milestones are for your user.
Understanding what to give away for free is the easy part.
The tricky part is understanding the best way to help users blast past those milestones.
That’s why the main meat of the Model Component is in Phase 2.
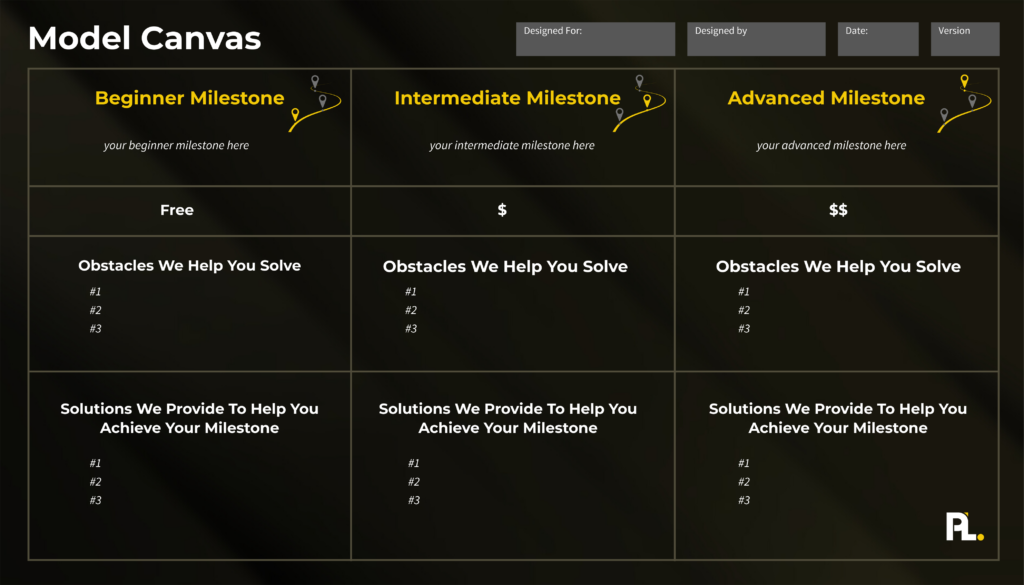
Before we dig into Upgrading Your Model, you must fill out your Product-Led Model Canvas (you can duplicate and use the template yourself).
Let’s dig in!
Phase 2: Upgrade Your Model
Now, I'm going to walk you through our five-step process so you can provide enormous value to your users.
Step #1: Prioritize Obstacles
One of the easiest ways to prioritize your obstacles is to validate if you’re solving a meaningful problem for your user.
In the User Component, you identified many potential obstacles your users will face in their pursuit of success.
Now it’s time to see which obstacles to solve first, as not all obstacles are created equal.
Here’s a handy checklist to make sure you’re prioritizing high-impact opportunities:
- ✅ This obstacle impacts our ideal user.
- ✅ This obstacle makes it harder for our users to experience success.
- ✅ Solving this opportunity is very important to our users.
- ✅ Our users currently have low satisfaction with the current solution.
- ✅ There’s a high opportunity to add value.
- ✅ This opportunity aligns with our strategic goals.
If you can confidently check the boxes on these criteria, you will be able to prioritize high-impact opportunities for your users.
Action items:
- The first time you go through this, start with identifying all the obstacles a user will encounter in pursuit of achieving their beginner milestone.
- Take each obstacle through the high-impact checklist.
- Identify the top three obstacles that will greatly impact your users if solved.
By going through this activity, you’ll apply much-needed rigour to deciding where to focus. It’s way too common for teams to skip this step and jump to designing solutions without having a good handle on what will impact the user and the business the most.
Now comes the fun part: we can put on our solution cap and go wild.
Step #2: Generate Solutions
Before you can craft a world-class product-led model, you need to identify the best way to solve your users' obstacles.
Now that you know your users’ obstacles, it’s your turn to put on your solution hat and go to war with them.
Imagine for a second that you’re playing football (the American version) and leading the defense players. Your goal is to tackle the entire opposing football team, representing obstacles for your user. The end result is your user can walk to the touchdown line and score a touchdown. That’s the golden standard.
A good solution can teardown any obstacle in your user’s way.
However, not all solutions are created equal. Some pack a punch, while others barely help.
The goal is to identify a solution that will make the user’s life 10x better than their current solution.
To do this, you need to create a volume of potential solutions. You want to generate at least 5 to 10 potential solutions for every high-impact obstacle you've outlined.
That means for the three obstacles you’ve selected from the previous step, you’re generating anywhere from 15 to 30 potential solutions.
It seems wild, but when you’re generating that many potential solutions, you’ll hit a wall. That’s when the really creative ideas come into play.
Pro tip: your solutions don’t have to be product-related.
When thinking through how to solve a difficult obstacle, ask yourself the PCR question to generate more solutions.
PCR stands for:
- Product
- Content
- Resource
Reviewing your top obstacles is okay if your solution is a piece of content or even a resource like a quiz. The goal is to generate as many solutions as possible to increase the odds of truly solving your users’ obstacles efficiently.
For instance, your ideal user faces obstacles such as building an email marketing list past 1,000 subscribers…
What potential solutions could you offer to help them accomplish that goal?
- Write a long article to help them get more subscribers.
- Create a free landing page solution that would make it easy for them to collect email subscribers.
- Recommend they manually reach out to 10 potential subscribers every day.
Each of these solutions offers a unique way to solve the obstacle.
The article helps them gain the skills to make the goal happen.
The landing page solution offers them an easy tool to collect emails.
While the manual approach helps the user develop the habit of building the list over a long enough time.
At this point, the goal isn’t to select the best solutions.
Here’s your action item:
- List out at least five to 10 potential solutions for each of your top three obstacles.
Remember: the goal here is to identify 10x solutions that can solve the problem so much better than the current solutions – 10x solutions are wildly better than the alternatives.
For instance, when ChatGPT came onto the scene, it was 10x better than most search engines at getting you answers for most problems you gave it. Hence why the adoption of the product was so high.
For now, I want you to brainstorm the craziest ideas that could have the biggest impact.
In the next step, we’ll slim these down. But for now, let your imagination go wild.
Step #3: Prioritize Solutions
In an ideal world, we could test out each of our potential solutions to see which would work best. However, in the real world, we have limited time and resources to build solutions, so we need to invest our time wisely.
To make the best use of our resources, we need to apply some rigour to selecting the solutions we’re going to test and build out.
For every solution you’ve built out, go through the Prioritization Checklist:
- ✅ Is the solution 10x better than their current solution?
- ✅ Does the solution quickly solve the user’s obstacle?
- ✅ Does the solution require little to no effort for the user to access the value?
- ✅ Does the solution align with our strategic priorities?
- ✅ Is the solution inexpensive to roll out?
- ✅ Have we validated all risky assumptions that were a part of rolling out this solution?
- ✅ Are we confident solving this obstacle will lead to a huge impact on our users?
If you can check the box on each item in this checklist, chances are you're sitting on a winning solution that you should greenlight.
However, what do you do when it’s not so black and white?
For instance, maybe it’s a 10x solution but requires six months for your team to roll out…
What do you do when it’s not clear?
That’s when it helps to introduce a lightweight decision framework.
One of my favorite frameworks for deciding what to prioritize came from Gibson Biddle, who invented the DHM Model.
It stands for Delight, Hard to Copy, and Margin Enhancing.
Basically, how it works is you list out all of your potential solutions in the left-hand column. Then you’d check the box on which one Delights, is Hard to Copy, and is Margin Enhancing.
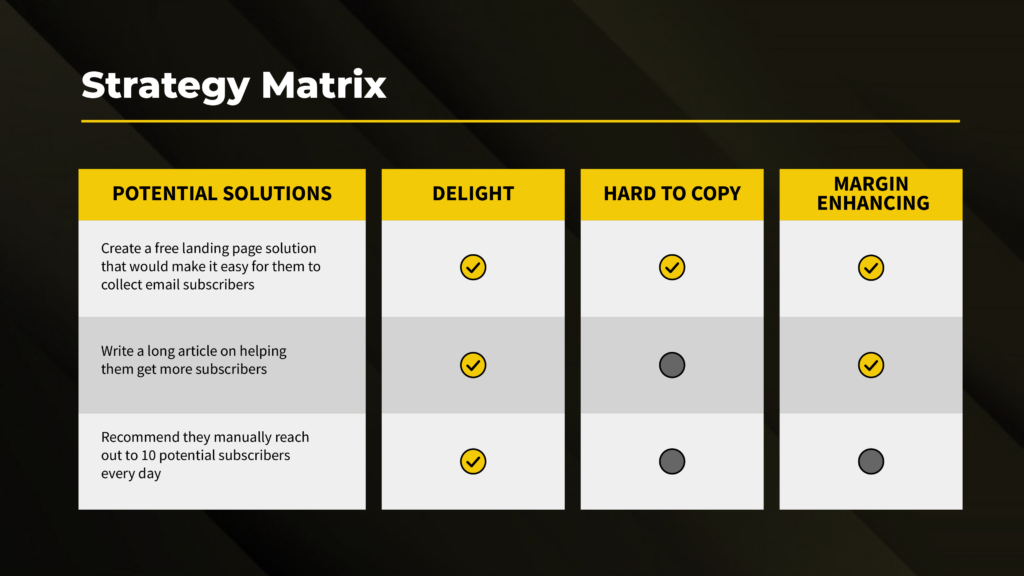
Based on plugging our three solutions into our strategy matrix, we can easily see that only one solution checks the box on our DHM Model.
In this case, investing considerable resources, time, and energy into building a new free landing page tool.
Alex Hormozir recommends prioritizing solutions by what drives the most impact for your customers and is the lowest cost to fulfill. I love how simple this approach is.
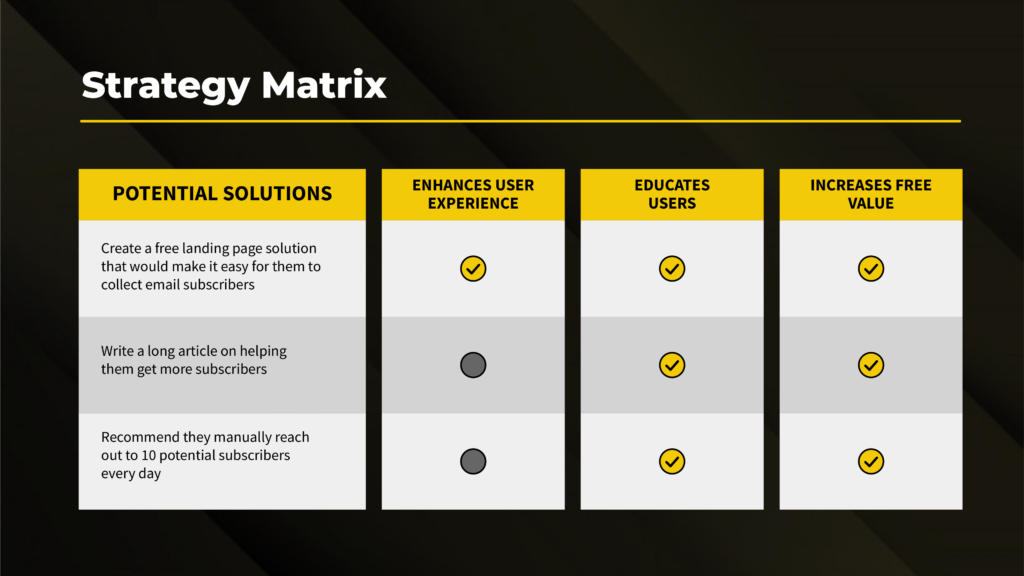
One of the most powerful ways to prioritize your solutions is by basing them on your “how-to-win” strategy (this was the first component in the ProductLed System™️).
You can do this by filtering the potential solutions that support your moat (from the Strategy component).
Here’s an example:
Let’s say the three moats that support your how-to-win strategy are:
- User and customer experience
- Education
- Free
You could then score your potential solutions based on the criteria:
This way, your strategy isn’t something you set and forget.
It’s literally baked into how you prioritize every initiative throughout your business.
Once you go through your personalized strategy matrix, you’ll hopefully be able to narrow down your potential solutions to just one or two high-impact solutions.
Here are your action items:
- Take every solution you have through the Prioritization Checklist and narrow your potential solutions to three to five high-impact solutions.
- Create your own strategy matrix that is based on your how-to-win strategy.
- Identify one or two solutions that help you lean into your strategy.
Once you’ve prioritized your solutions, it’s time to build them out.
Step #4: Create Solutions
Not all solutions were created equal.
For example, at John F. Kennedy Airport, travelers were complaining that they were waiting too long for their baggage. The airport staff formulated a few solutions, such as hiring more staff to take the bags off the plane faster, investing more in technology to speed up the baggage offboarding, or making it longer to walk to the baggage claim area.
Since the third option was the most affordable and easiest to roll out, they opted to make their passengers walk longer, and you know what… it worked. Making travelers walk longer to the baggage claim area made it feel like they were waiting less time for their bags. As a result, satisfaction went up.
Why?
Because it feels long when you’re just staring at the baggage claim trolly waiting for your bag. Yet, when you’re walking to something, time passes faster.
I share this example because when a company has access to a lot of resources and talent, it’s easy to invest in building out expensive solutions. Yet a scrappy startup can, and always will, find an alternative solution that might work just as well for a fraction of the investment. Simply because they had no other choice.
Pro tip: If your solution takes a really long time to build out, define a minimum viable test to prove that it’s worth investing more time in rolling out. It’s always a shame when teams forge ahead on one big solution without testing some of the risky assumptions around the idea.
Your action item is:
- Build out your one top solution that will have the biggest impact on your user.
Once you’ve built it out, let’s integrate it into the business.
Step #5: Integrate Your Solutions
When you decide to eat something, your body integrates whatever you eat into energy.
If you eat crap, your body tries its best to integrate that shit into energy. If it doesn’t like it, you might get indigestion, an upset tummy, or something else.
If you feed it high-quality food, your body will digest it easily and turn that into an enormous amount of energy.
I like the food analogy as it relates to understanding how to integrate solutions into your business. Because if you start off with a bad solution (i.e. ingredients), it’s going to be a bumpy ride no matter what.
Yet, if you start with the high-quality solutions you’ve rolled out, it’ll be way easier for the company to integrate.
To truly integrate a solution into your business it involves three steps:
- Step 1: Launch the solution
- Step 2: Measure success
- Step 3: Optimize the solution
Let’s start off with what launching your solution might look like.
Launch your solution
Launching your solution will look different for every department, depending on whether you’re launching a piece of content, a new feature, or a marketing resource, so I won’t go into the specifics for each.
What I will go into is how to think about rolling out any new solution. You want to start with identifying who you are going to distribute it to first.
Let’s take launching a long-form piece of content. Here’s how we’d approach launching it:
- ✅ Share it with our customers.
- ✅ Share it with our marketing list.
- ✅ Share it on all our social channels.
For a new feature, it could look like:
- ✅ Share it with our ideal customers first to get feedback.
- ✅ If we see good positive results, share it with more of all of our users.
- ✅ Start promoting it on the website to drive new signups for this new feature.
- ✅ Introduce this feature as part of the onboarding sequence.
The key is to launch in waves of potential users so you can maximize the amount of feedback you receive. For instance, when you launch to only your power users, you can get incredible feedback from them, adapt the solution based on it, and then roll it out to all your customers. Then, you can get more feedback and roll it out to all your users. Then, continue with the same cycle of feedback. At each stage, you increase your learnings and can refine your solution so that it’s truly world-class.
Here’s your action item:
- Create a launch checklist for how you’re going to launch your solution.
Once you’ve launched your solution, it’s time to measure whether it was successful or not.
Measure success
When it comes to measuring success, here are the three most likely scenarios post-launch:
Scenario 1: Your solution is wildly successful
I wish I could say that even if you go through the first four steps, you’ll wind up with a home run every time. Unfortunately, that’s not the case. The first four steps help you increase your batting average so you can hit more home runs over time. But launching solutions is a numbers game. The more you launch and understand your users, the better you get at predicting what will make a huge impact. So when you do hit a home run, what do you do? If you can double down on it in any way, do that. It’s worth investing more time to improve your solution even more. If your solution is unique and differentiated, you might decide to lean more into that in your marketing copy. You might decide to update your onboarding flow to help more people experience this new solution. You might decide to write more blog posts around this new solution. You get the point. When you hit a home run, let’s make sure the world knows. Or at least your ideal users, for starters. ;)
Scenario 2: Your solution flops
After all your hard work, you launch the new solution, which doesn’t impact you. It’s not the end of the world. It’s only a failure if you don’t learn from it. To learn from it, do a retrospective and ask yourself these three questions:
- What went well?
- What didn’t go well?
- What should we do differently next time?
Pro tip: do this with every team member who was involved in the process of launching this solution so they can all weigh in on why it wasn’t successful and what to do differently next time.
Scenario 3: You can’t tell if your solution made an impact
Rest assured, this one isn’t too uncommon. It typically happens when a team doesn’t scope out what success looks like before launching the new solution. There was no success metric to monitor. If that’s the case, you can review what success should look like for launching this solution and then re-evaluate based on the data if you have it. Most likely, your solution had little to no impact. Or maybe even a negative impact. If that’s the case, you can decide to kill it if it made a negative impact. If it is slightly improved, you might decide to invest more time to optimize it. Or if it’s not really made any impact but adds more complexity to the product, you can also kill it.
Here are your action items:
- Set key metrics to monitor the solution's success before launching it.
- Measure the success of that solution after giving it a realistic timeline to see if it made an impact of not.
- Once you have measured the success of the solution, decide to keep, kill, or optimize it.
Now, for those of you who created a solution that made a positive impact, bravo!
It’s time to optimize that solution.
Optimize the solution
Most companies miss this last step. They go on to solve the next obstacle and miss a huge opportunity. A lot of times, our first solution does a good job of solving the obstacle. But if we spent another cycle or two on optimizing it, we could take that solution from good to great.
For instance, I created a free trial versus freemium article, and it did really well. We optimized the article, which helped a bit. But it wasn’t until we created a complimentary free trial versus freemium quiz and embedded it inside the article that it really took off. We optimized something that was already working and created a differentiated solution that nobody else had in competing articles.
Now it’s your turn:
- Identify several solutions that are working really well for your business.
- Ask yourself what is one or two things we could do to take this to the next level.
Now let’s recap everything.
Putting it all together
Building a product-led model is all about deciding what to give away for free and what to gate.
When you’ve identified the key beginner, intermediate, and advanced milestones in your user’s journey, it becomes much easier to know what should be freely available and what should remain gated.
The goal is simple: create solutions that enable your users to overcome any obstacles to success. By giving away the beginner milestone for free, you allow users to “try before they buy” and experience value from your product early on.
As you continue to refine your model and solve your users’ top challenges, you’ll become better at helping them achieve value—leading to higher engagement and more conversions.
If you’re not sure where to focus first, start by completing the PLG readiness assessment. It’s a quick way to identify where your current product-led motion may be strong and where you could improve.
Once you have a clearer picture, you can schedule a strategy session to explore the best next steps for your business.
To continue building your product-led business, be sure to work through the other eight components of the ProductLed System™️.
Alternatively, if you’d prefer hands-on guidance, the ProductLed Implementation Program can help. It’s our intensive coaching program where we’ll work with you and your team to build a strong foundation for product-led growth so you can scale faster and with more control. We’ll guide you through every component, including how to align your team around your ideal user profile.