How to Personalize Your User Onboarding Experience
Onboarding
All

More than 60% of users say that onboarding is key to deciding whether they upgrade to a paid plan or not.
That’s A LOT of potential churn if your onboarding isn’t on point. If you have 75 potential customers in your pipeline and a lifetime value (LTV) of $400, you’re losing $18,000 of potential revenue.
Yet, most SaaS companies I’ve spoken to – and I’ve spoken to a lot – have never reviewed or audited their onboarding experience.
And this is usually clear in their onboarding experience if you sign up for a free trial.
I find more times than not, there’s a barrier or two getting in the way of even the most ready and raring user that could stop them from moving forward.
We’re talking ‘Get Started’ buttons that don’t work, banners that accidentally hide CTAs and even old registration forms that were thought to have been retired but are still linked to a CTA in the footer.
Instead, they’ve adopted a "build and leave it" approach.
Some make tweaks based on results and feedback (and that’s great!), but rarely is the entire experience reviewed from end to end.
Over the past 14 years, I’ve worked almost exclusively in the tech and SaaS world. I’ve been a Head of Marketing for a publicly traded company, designed a mass outreach email solution for a global recruitment agency, and helped shape one of the first facial biometric analysis platforms for the ad tech world.
And the part I loved the most about every role I’ve had was the customer experience (CX).
I loved shaping products to solve customer problems and delivering experiences that (cheese alert) delighted them at every step.
Having spent the past 14+ years working with and building SaaS platforms across almost every perceivable vertical, I’m here to tell you that not only should you be auditing your user onboarding experience – and repeating the process every three to six months for continued improvements to, and data-driven decisions in, your onboarding strategy – but I’m also going to show you how.
In a best-case scenario, an effective user onboarding experience takes a first-time user and quickly converts them into a long-term engaged power user that drives advocacy.
Onboarding experiences can range from fully automated self-serve solutions that offer infinite scalability and targeting all the way through to one-on-one sales-led approaches that provide the flexibility needed for certain users and accounts.
Having worked on hundreds of onboarding experiences, I’ve seen the same issues time after time.
These include:
Project after project, I found myself repeating the same process.
I’d begin by going through the onboarding experience and then repeating the process and recording the experience, and then mapping out the entire flow with screenshots and Loom videos in a Figjam/Miro.
I’d add my findings and markup comments about the good, the bad, and the ugly, and I’d collate everything into a recommendations list with suggestions for improvements.
These recommendations were instrumental in shaping a new and improved onboarding experience for my clients. But what was less expected was the power of visualizing the end-to-end user experience.
I’m someone who has to visualize everything to fully understand it, and when my clients were able to see it mapped out in this way, it was as powerful as the recommendations themselves.
There's no better way of understanding a process than mapping it out – it’s one of the most underused techniques in user onboarding. With FigJam and Miro on our doorstep, it's easy to do.
In this article, I want to share my techniques for conducting a user onboarding audit for your SaaS platform. It’s an incredibly eye-opening experience that provides powerful insights for improving your onboarding.
There are no restrictions for the types of SaaS platform this will benefit: whether it’s a self-serve or a sales-led solution, includes a free trial, or requires users to pay from day one.
The process of mapping out your onboarding experience will highlight any blockers or issues that could prevent users from realizing the value of your platform and ultimately becoming paid subscribers and long-term customers.
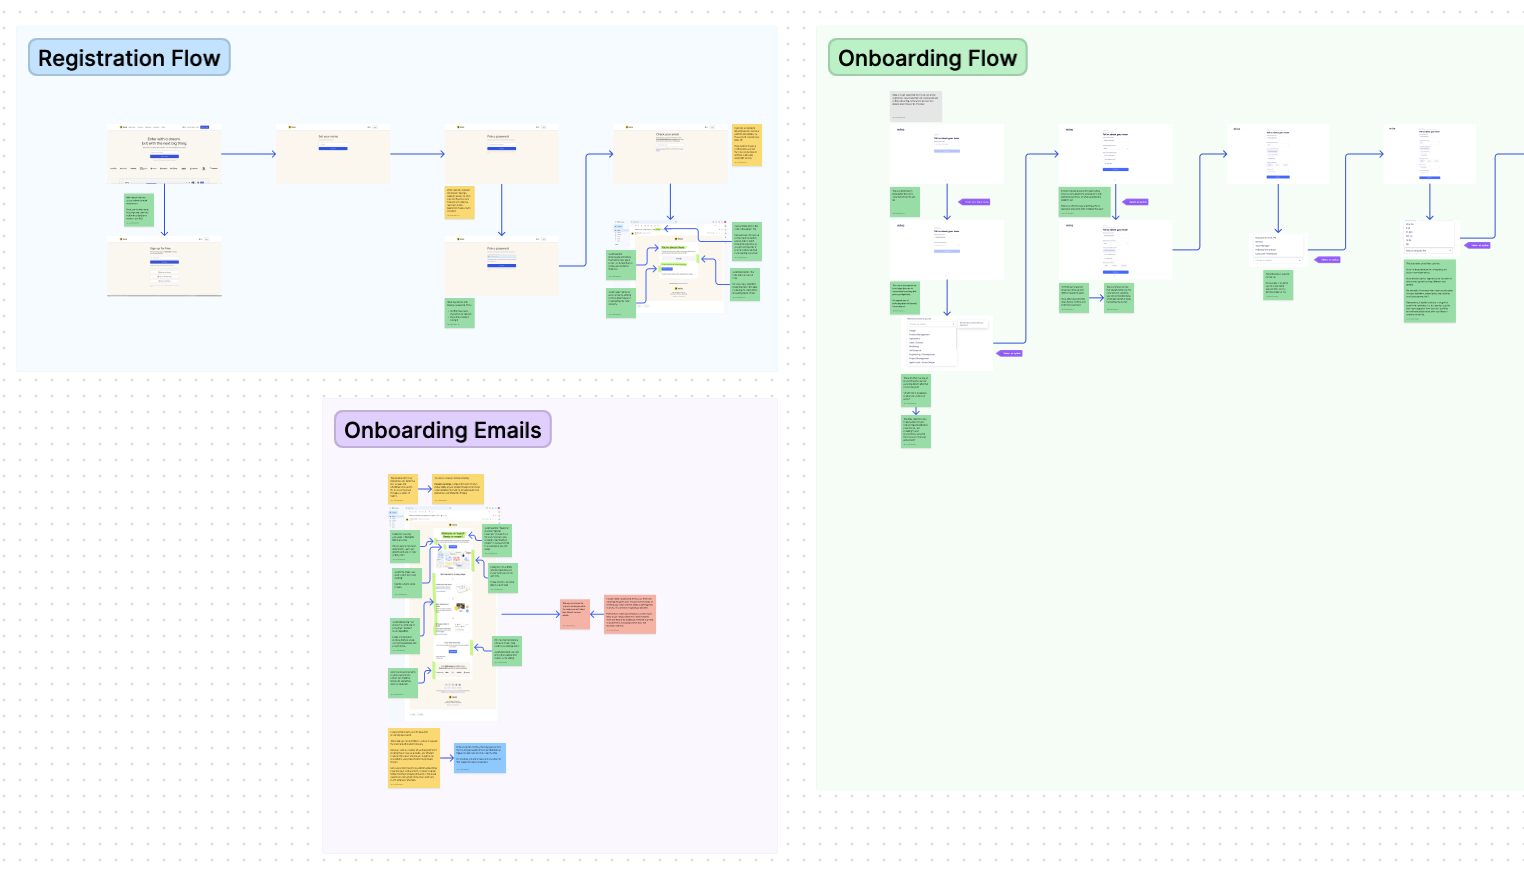
To help you visualize what the end result is, below is an onboarding audit I've created. By the end of this article, you'll be able to create one of these on your own.
Auditing your onboarding experience lets you see your users’ end-to-end journey through your website, registration flows, platform, and any other channels you use, such as email, SMS, or chatbots.
The benefits of doing this include:
What’s more, by layering over the performance metrics, such as registration drop-out, product walkthrough completion rate, and paid subscription conversions, you can start to understand the ‘why’ behind the results.
Now, this doesn’t replace the need to speak to your users and collect feedback, but it does give you an additional layer of context that you didn’t have before.
The short answer is ‘no.’
Any experience, whether it be self-serve and product-led growth (PLG) focused, sales-led, or any kind of hybrid model, can benefit from a user onboarding audit like this.
In a situation where PLG is the holy grail, I look for every opportunity I can to inject self-serve touchpoints into the experience.
However, when you have sales-led considerations to take into account, you need to think carefully about how you can help users achieve their goals while integrating the necessary human touchpoints.
Regardless of whether your experience contains self-serve onboarding touchpoints or not, it will have steps and a flow to it – even if those are manual and behind the scenes.
Mapping out your experience, including any offline or sales-led touchpoints, will help you identify the current situation and therefore make improvements to it.
Most self-serve and PLG experiences include a whole host of touch points that are hidden from the view of the user, whether they be automatons in the CRM, manual tasks for the Sales team, or even operational elements such as customer support, reporting, or growth optimizations.
Even if you have an entirely manual, hand-held approach to your user onboarding and sales processes, I encourage you to continue reading and apply these techniques to audit your own process.
And if you’re looking to make moves towards a more self-serve approach to your onboarding, or you’re currently in a PLG motion, then these tips and tricks will help you build the best PLG experience for your users.
To see an audit in action, I’ve created an audit of the digital collaboration tool Miro, which I’ll be referring to throughout the rest of the article.
Just as you would lay out all the ingredients when cooking a meal, I highly recommend preparing yourself for an onboarding audit in this way.
What you’ll need:
It’s important to split the journey into sections, for example, if you’re starting your audit at the landing page, then create a section that focuses on the landing page.
Then move on to the registration flow, then the initial onboarding experience, then the onboarding email drip campaign, and so on.
Below is a birds-eye view of what this could look like.
This will help you stay focused and allow you to share specific areas of feedback with the relevant people and teams in your business.
I always recommend starting at the beginning of a user's onboarding journey. And, as I’ve just alluded to, this should start at the website landing page, whether this be your homepage, a pricing page, or even a dedicated landing page.
If your user is likely to go through a number of website pages, then map all of these out. The point is for you to really immerse yourself in a user’s true experience and leave no stone unturned.
Here’s how to get started.
A great way to kick-start the audit is to go through as many of the key experiences as you can and record yourself as you do it.
This could include the website and landing page experience, the registration flow, the initial ‘welcome’ onboarding experience when you first experience the platform, and possibly some initial emails that come through into your inbox.
I like to use Loom and record both the screen and my reaction.

This allows me to experience the journey just as a real user would.
I can note any reactions in real-time, which are recorded and can be reviewed again later with any comments added to the map or shared directly with other team members.
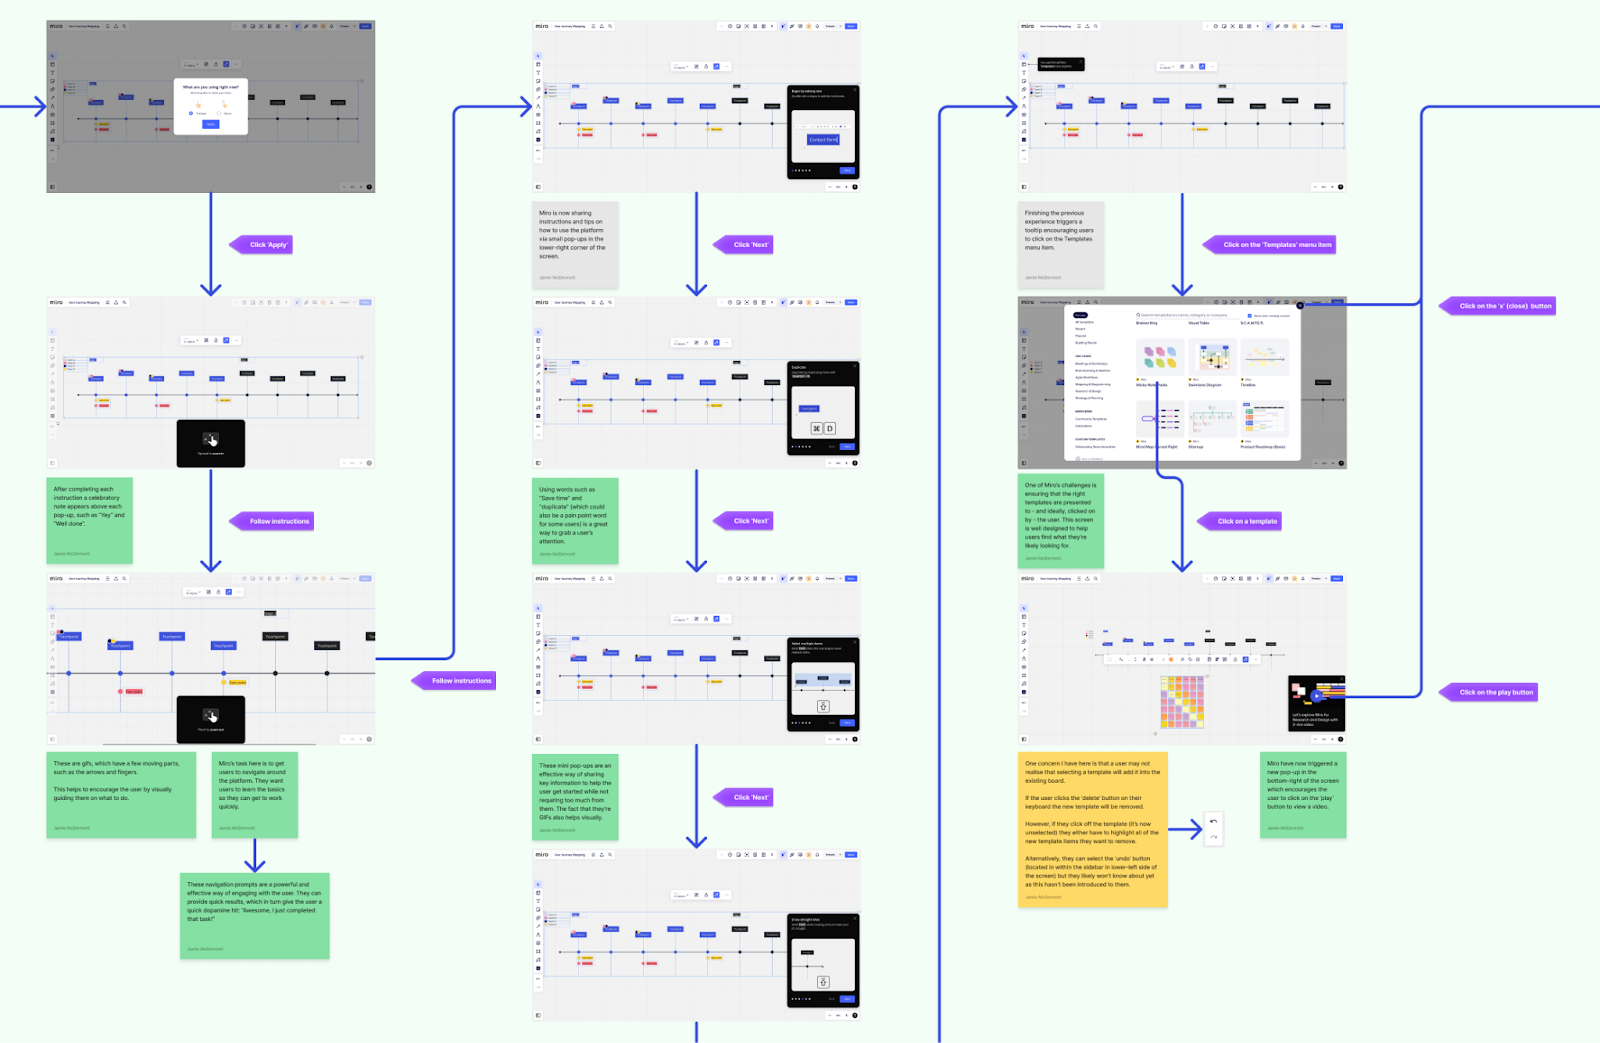
Once I’ve done this, I then move on to mapping out the experience from the beginning – however you’ve chosen to define that (website, registration page, etc.) – and taking screenshots of every step.
Be sure to restart your experience using different credentials in the registration. I typically do this with test email addresses; disposable email addresses are a great way to manage this too.
Once I’ve gone through the experience in real-time and recorded a video reaction of me doing this, I then turn to mapping out the experience using screenshots.
It’s an incredibly simple yet powerful way of capturing each step and touch point.
The process is generally the same with every step. Here’s what you should do:
Start adding your notes and markups as you go. Sometimes I like to import all of the screenshots for each step of a particular flow before adding notes, and other times I like to add notes as I go so I don’t forget a crucial bit of feedback.
For example, you might want to take a screenshot of every step in the registration process before adding notes so you can experience the entire process in one go. Other times it might be better to make notes as you go so you don’t forget anything.
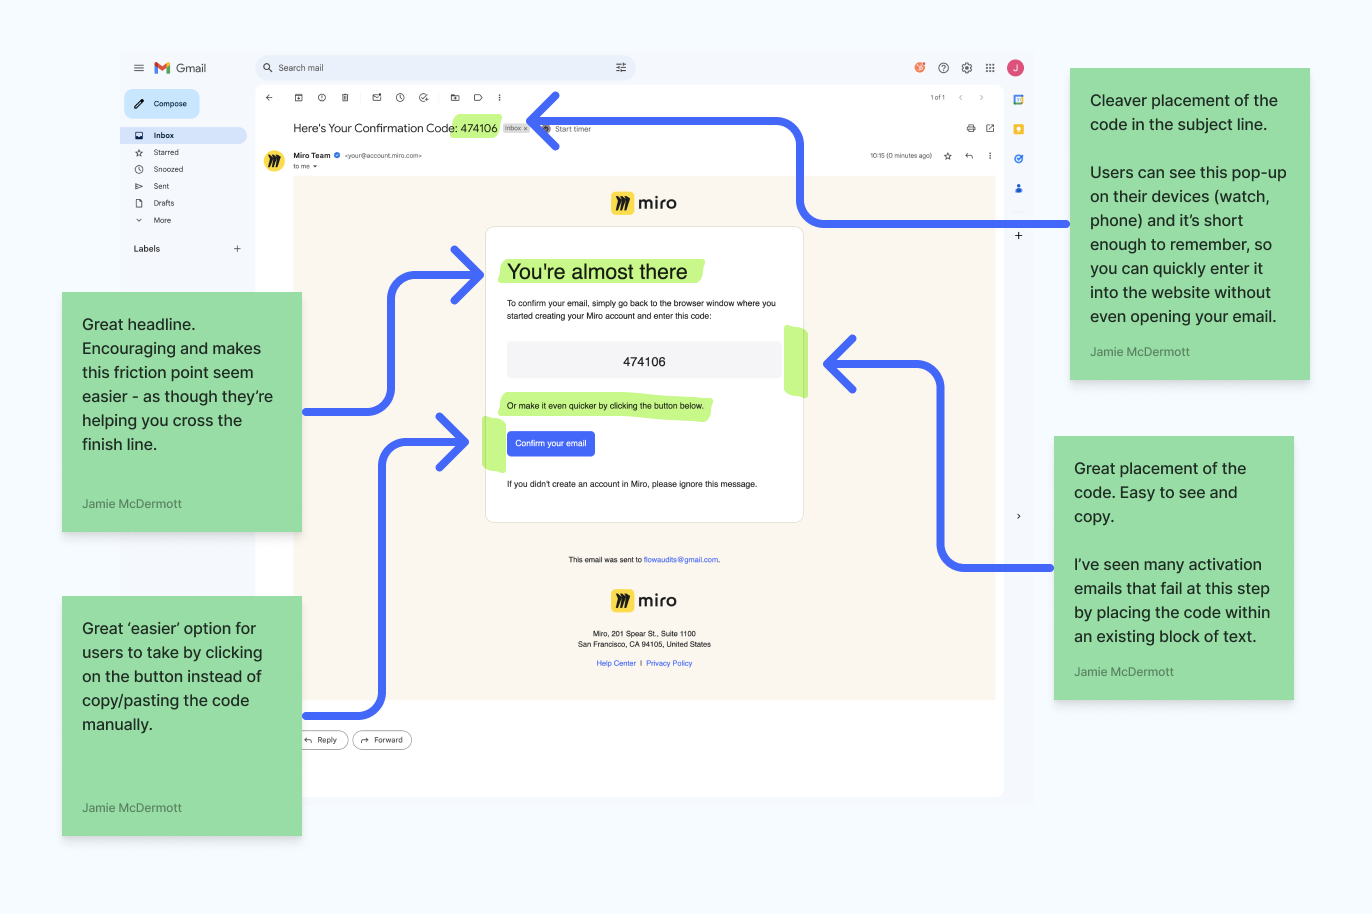
As you can see in the above screenshot, you may end up with a lot of thoughts, ideas, and even issues with a particular part of an experience.
Don’t worry. This is what you want. You need to record all of your findings and ideas in this way and then come back and review them afterward.
At that point, you can narrow down priorities, create a list of key issues, and suggest recommendations.
Once you’ve finished adding each step for that part of the experience, you should have something resembling the board below.
You can take the audit even further by layering your data into each step.
Decide on a few top metrics, such as completion or drop-off rates, conversion rates, clicks, or views, and include this data so you can see how effectively your existing experience is moving users through the funnel and onto your ultimate goal(s), i.e., trial to paid conversions, and churn reduction.
But don’t let data lead the way. This process is not purely based on data. It’s also about experiencing and recording the user journey and learning from that process.
Data can be incredibly valuable but don’t let yourself get carried away with it. You might not have as much data as you’d expect, especially if you haven’t added tracking events to every part of your platform.
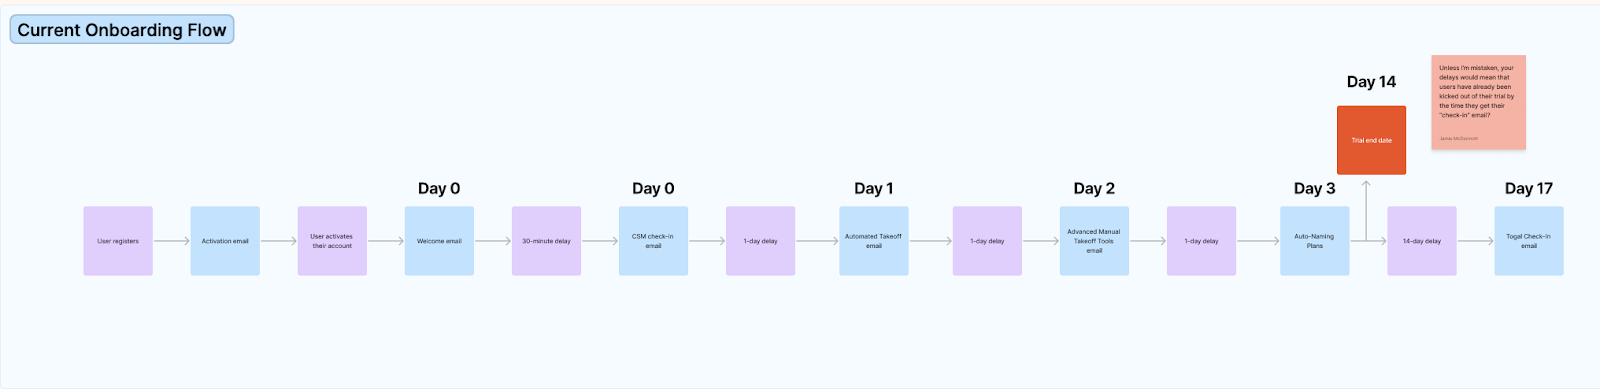
Your audit is not complete without the additional channels that make up your user onboarding experience.
This could include a lifecycle email sequence, SMS, and manual touch points including phone call sequences.
Mapping out these experiences is very similar to the previous step: take screenshots of every email in the sequence and list out the rules and triggers for each.
I also recommend mapping out the sequence as a whole using drawing tools, Miro and Figma have these features built in. Map out each step, including any delays or sending rules, so you can see the entire sequence from start to finish.
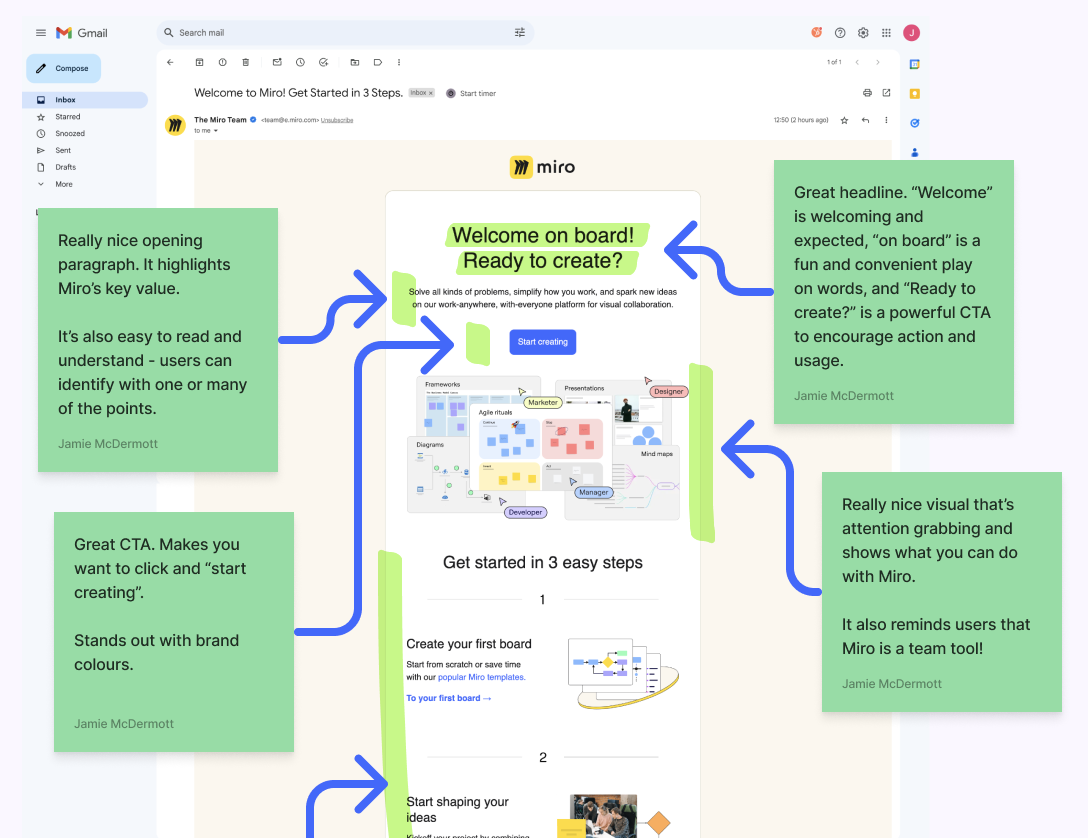
Next, review each email, noting anything you like, or dislike about it. Even if you were the one who created this content in the first place, you may find you have new thoughts and ideas since you created it or because of this new perspective you’ve got.
At this point, once you’ve mapped out all of the onboarding steps for each of the experiences and channels, it’s time to go back and review everything.
Just as you would with anything else that you’ve created, taking a step back and then reviewing it is a great way to clean everything up and start thinking about the priorities.
Chances are that you will have found a ton – possibly hundreds – of improvements to make. Some small, some big. But it’s important to prioritize and create a list of action items and recommendations for you and your team to tackle.
The hard work has already been done.
Your notes will form the basis of your recommendations. All you now need to do is prioritize them and create actionable recommendations that will have a meaningful impact on your user onboarding experience.
Start by going through your notes and listing out recommendations for each. You’ll find that many of your notes can be merged together into one task.
List out these recommendations giving each one a clear and concise task, adding any additional context into the description.
Once you’re happy with your recommendations, it’s time to put them in priority order thinking about the direct impact they could have on the onboarding experience and, primarily on the metrics you want to improve, such as faster activation time or increased percentage of trial users that convert to paid plans.
Depending on your budget, time, and resources, you may find that you have to be quite ruthless with your prioritization.
Don’t worry about this. I find that starting small is the best approach. Introduce a few changes to begin with and roll out further improvements every week/month.
This is also a great way to test small changes and review the results without blindly jumping into the deep end and finding yourself wondering which update moved which needle.
I find the review phase is a great time to record your thoughts.
Now it’s time to record an overview of your findings and recommendations for each section.
Imagine you’re speaking to multiple people across different departments, including those who need to buy into implementing the recommendations, even if you’re the final decision maker.
This will help you to position your feedback and recommendations and framing them in a way that directs attention to the most important parts.
The audit process might seem time-consuming, especially if you’ve not done this before (and if you have a long and complex user journey). But the outcomes will grow your ARR:
You’ll identify issues that you never realized were a problem in the first place, and you’ll note areas of optimization that you can’t believe you missed. Your audit will form the foundation of your onboarding strategy moving forward. You’ll be able to revisit it whenever you have a question to answer or an experiment to implement.
That is the beauty – and power – of this auditing process. it becomes your record of history and North Star for your onboarding experience.
In short: it’s worth your time.